


Nestjs is a modern framework for building efficient and scalable web applications with Node.js. It uses TypeScript as the main language and offers a modular architecture based on dependency injection. Nestjs also allows easy integration of external tools like databases, cloud services, validation libraries, etc. You can learn more about NestJS from its official website or its documentation. 😊
In this article, we will see how to implement the functionality of Uploading a file using the nests framework. This functionality can be useful for scenarios like data import, file processing, report generation, etc. We'll use the @nestjs/platform-express module to handle HTTP requests, the multer module to handle file upload, and the fs module to read the file content.
To begin I am MUHESI VYAHAVWA Moïse, a professional full-stack software engineer with expertise in JavaScript technologies, passionate about building 𝐟𝐫𝐨𝐧𝐭𝐞𝐧𝐝 𝐚𝐧𝐝 𝐬𝐞𝐜𝐮𝐫𝐞𝐝 𝐛𝐚𝐜𝐤𝐞𝐧𝐝 𝐚𝐩𝐩𝐥𝐢𝐜𝐚𝐭𝐢𝐨𝐧𝐬, I like reading books of software technologies to increase my technical knowledge. With an experience of over 4 years, 𝐈 𝐡𝐞𝐥𝐩 𝐩𝐞𝐨𝐩𝐥𝐞 𝐛𝐮𝐢𝐥𝐝 𝐛𝐮𝐬𝐢𝐧𝐞𝐬𝐬𝐞𝐬 𝐰𝐢𝐭𝐡 𝐬𝐨𝐟𝐭𝐰𝐚𝐫𝐞 𝐬𝐨𝐥𝐮𝐭𝐢𝐨𝐧𝐬 𝐚𝐭 𝐬𝐜𝐚𝐥𝐞. Click here to see my hashnode profile
Ready to get started? Let’s dive in! 🚀
let us create a nestjs project called upload_get_file from this command in your terminal
npm i -g @nestjs/cli
nest new upload_get_file
once we setup the project, let's run this command to install all necessary packages
cd ./upload_get_file
yarn add @nestjs/platform-express multer
yarn add --dev @types/multer
Here we are good to implement uploading files in this project
Now let's to implement the file module in our application : open your terminal and tape this commands:
nest g mo file --no-spec
nest g co file --no-spec
With these commands, we created the file module. We could put this module in the modules directory if we want. the commands should be nest g mo modules/file --no-spec and nest g co modules/file --no-spec
The first command: created the module file
file.module.tsThe second command creates the
file.controller.ts.
The --no-spec option tells NestJS not to generate a test specification file for the module. If you want to read more about nestjs CLI, click here
In file.controller.ts file we create a simple method uploadFile() , we put The @Post() HTTP request method decorator before, which tells Nest to create a handler for a specific endpoint for HTTP requests. Don’t forget to change @Controller() decorator like this : @Controller('file') So our file.controller.ts should be like:
import { Controller, Post } from '@nestjs/common';

@Controller('files')
export class FileController {
    @Post('/upload')
    uploadFile() {
        return "FILE UPLOAD API";
    }
}
To test this endpoint, I am going to use Postam,
Postman is a popular tool for developers who work with APIs. It allows you to create, test, document, and share API requests in a user-friendly interface. You can also use Postman to collaborate with other developers, run automated tests, and integrate with other services. Click here to learn more about it.
Open up your terminal and run the project with yarn run start:dev and you should se after running something like that:

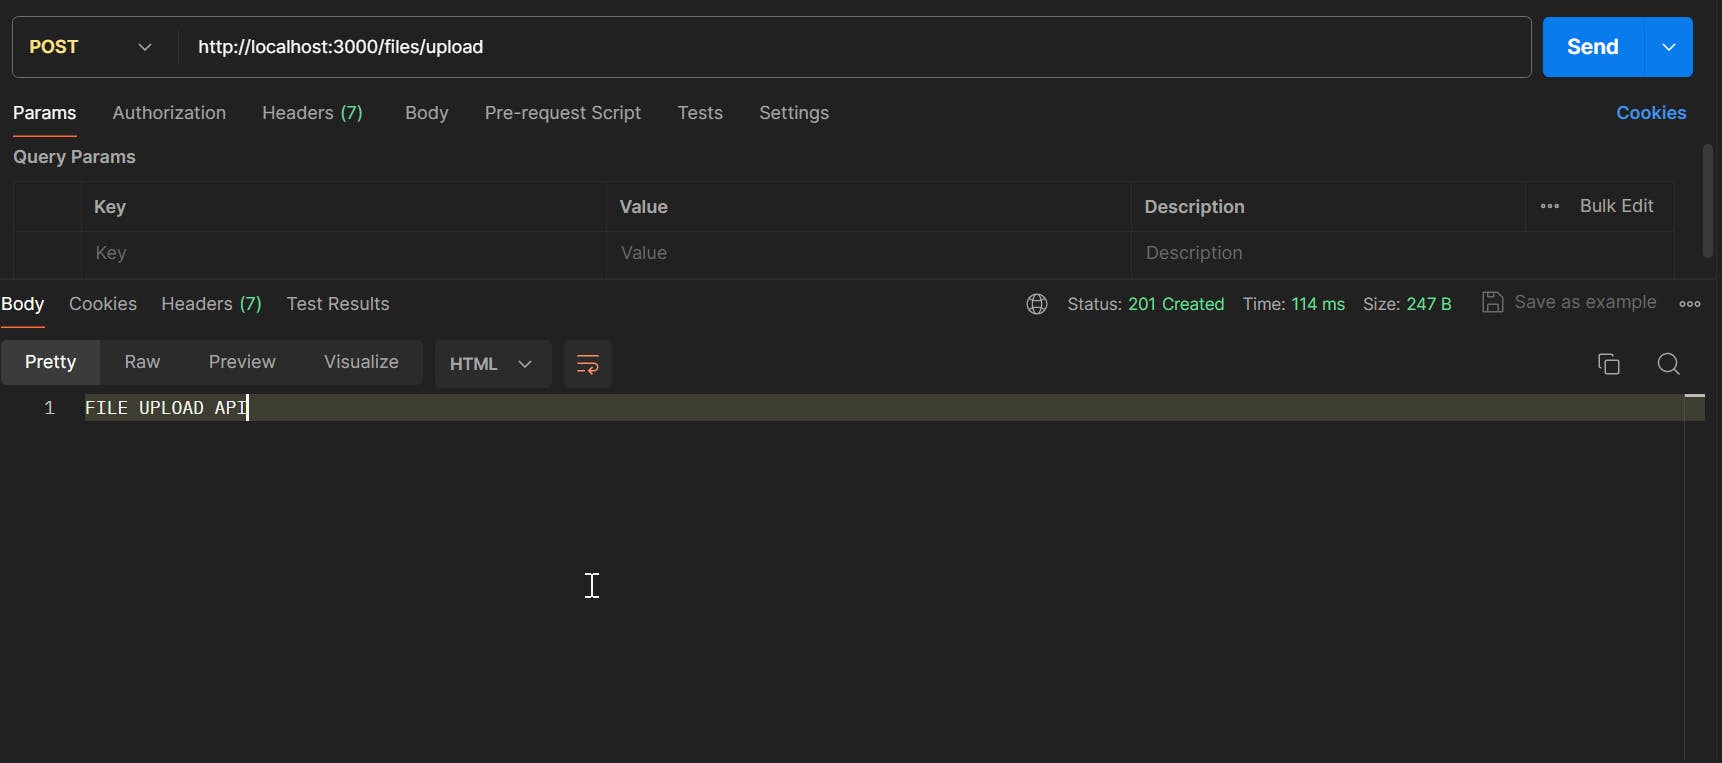
after testing this endpoint (http://localhost:3000/files/upload) In the Postman app you should see this one :
let's update file.controller.ts before uploading a file.
import { Controller, Post, UploadedFile, UseInterceptors } from '@nestjs/common';
import { FileInterceptor } from '@nestjs/platform-express';

@Controller('files')
export class FileController {

    @Post('/upload')
    @UseInterceptors(FileInterceptor('file'))
    uploadFile(@UploadedFile() file: Express.Multer.File) {
        console.log('file :>> ', file);
        return "FILE UPLOAD API";
    }
}
👆 We use the @UseInterceptors decorator to apply the FileInterceptor interceptor to the uploadFile() method. This interceptor will extract the file sent by the client and store it in an object of Express.Multer.File type, which is an interface defined by the multer module,
The 'file' parameter to indicate the name of the form field containing the file.
The @UploadedFile decorator to inject the file extracted by the interceptor into the file parameter of the uploadFile method. This parameter is Express.Multer.File type which contains information about the file, such as its name, size, type, and so on.
So open up the Postam app and let's try to upload a file.


👆 As you can see, I uploaded a file organization.png which is a photo, so after execution, we see the information in the terminal as I implemented it in the uploadFile() method
Define the directory where files will be stored and generate the file name before saving
For that let's update app.module.ts file like this:
import { Module } from '@nestjs/common';
import { MulterModule } from '@nestjs/platform-express';
import { AppController } from './app.controller';
import { AppService } from './app.service';
import { FileModule } from './file/file.module';

@Module({
  imports: [
    MulterModule.register({
      dest: './uploads'
    }),
    FileModule,
  ],
  controllers: [AppController],
  providers: [AppService],
})
export class AppModule { }
    MulterModule.register({
      dest: './uploads'
    }),
👆 This part of the code registers the MulterModule with an option specifying the destination directory for downloaded files.
The dest parameter indicates the path where multer will store files on the server. In our case, we've chosen the ./uploads directory, which is relative to the current working directory.
Using this option, multer will generate a random name for each uploaded file and save it in the ./uploads directory.
But if we want to control file names and formats, we need to use another option called storage, which allows to define a custom function to manage file storage.
So let's go back to file.controller.ts to implement this function, update this file like this:
import { Controller, Post, UploadedFile, UseInterceptors } from '@nestjs/common';
import { FileInterceptor } from '@nestjs/platform-express';
import { diskStorage } from 'multer';

@Controller('files')
export class FileController {

    @Post('/upload')
    @UseInterceptors(FileInterceptor('file', {
        storage: diskStorage({
            destination: "./uploads",
            filename: (req, file, cb) => {
                const uniqueSuffix = Date.now() + '-' + Math.round(Math.random() * 1e9);
                const nameTab = file.originalname.split(".")
                const subArray = nameTab.slice(0, -1);
                const originalName = subArray.join("")
                const ext = `.${nameTab[nameTab.length - 1]}`;
                const filename = `${originalName}-${uniqueSuffix}${ext}`
                cb(null, filename)
            }
        })
    }))
    uploadFile(@UploadedFile() file: Express.Multer.File) {
        console.log('file :>> ', file);
        return "FILE UPLOAD API";
    }
}
Basically,
The interceptor, of type FileInterceptor , is the one that processes the file sent with the field name file. We add another argument which is an object that specifies the configuration options defining the storage mode and the file name:
like
diskStoragefor storage mode: specifies the file storage directory, in our case it's./uploadsthen we have
filename: to name the file:
The file name is generated by a function that takes the query, the file, and a callback function (cb) as parameters. The file naming function performs the following operations:
It creates a unique suffix by combining the current date with a random number and
It constructs the final file name by concatenating the initial name without the extension, the unique suffix, and the extension.
In the end, It calls the callback function with the final file name as the second argument.
Let's try again to upload file.

We are good👍👏

Conclusion
We've seen how to implement file upload functionality using the nestjs framework. We've used the @nestjs/platform-express module to handle HTTP requests, the multer module to handle file uploads, we've also seen how to configure multer's middleware, how to define the controller to process files like generating a unique name before saving the file etc....
I hope you enjoyed this tutorial and found it useful.
Thanks for sharing, like, commenting and ifyou have any questions, feedback, or suggestions, please feel free to leave a comment below. Thank you for reading!